文件重命名
mv a.xxx b.png
technical record
对于任何一门知识体系,一定有一个最小基本单位,基本概念,其他的概念或是规矩都是基于这几个基本的东西在玩花样。对于这个很基本的分析问题的方法,混沌大学的李善友老师还起来一个非常高大上的名字叫做“唯一性原理”,有点故弄玄虚,其实叫啥无所谓,面对同样一份原始数据,如果你有相关的知识,你就能将数据切的更细,那就能看到更多东西。
先列举下Baseband的几个基本单位:
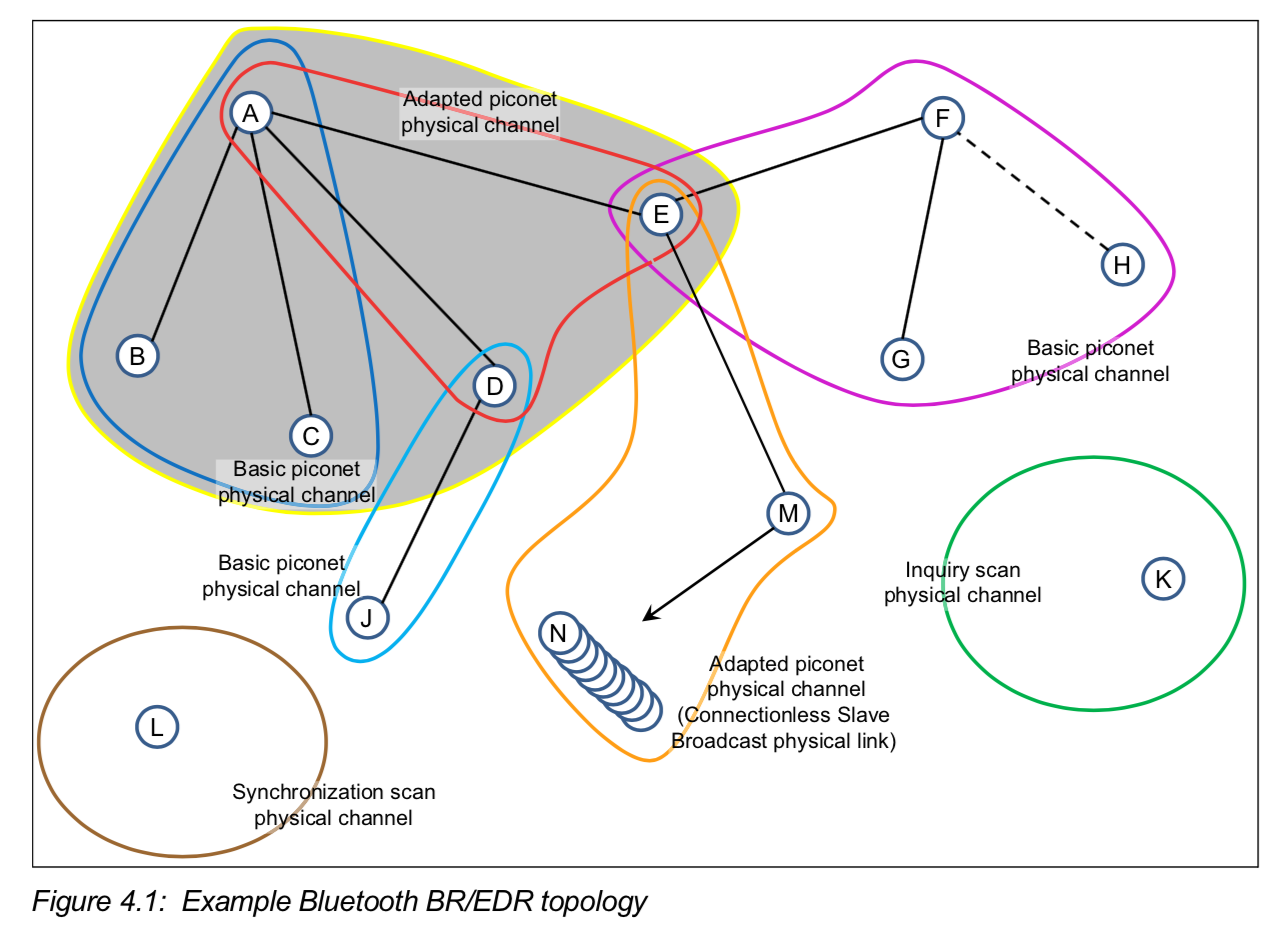
跟其他网络技术一样,蓝牙也有自己的网络。网上把这个单词翻译成微网。在蓝牙设备没有跟其他蓝牙设备连线的时候,它自己属于一个piconet。当有连线后,piconet里有两种角色:master 和 slave。发起连线的一方是master,被连接的一方是slave。slave会以master的时钟为参照,以625us为时间单位,与master进行数据收发。每一个piconet里,一个master最多有7个slave。
这里的Mode其实对应的是Modem,数据编码不同,那Modem就不同,传输数据的速度也不同。
Clock是蓝牙通信最最基础的一个概念,clock定义了通信的时空范围,定义了这个Piconet时空的坐标系,只有在同一个坐标系里,网络内的各个角色才能相互了解对方的时间线,才知道什么时候发包,什么时候收包。
BT clock是个28bit的计数器,每tick一次是312.5us,所以总共有 (2^28 -1)个tick,算一下大约是(2^28-1)*312.5us/10^6/3600 = 23.3个小时后clock会翻转。

针对clock有几个概念也要知道下:
CLK0, 312.5us,是一个tick
CLK1, 625us, 是一个slot
CLK2, 1.25ms, 是一个frame(做一次TX 和 RX)
CLK12, 1.28s.
Clock的精确度要求为 +/-250ppm 和 +/-20ppm
蓝牙地址有48bit,需要跟IEEE去购买。
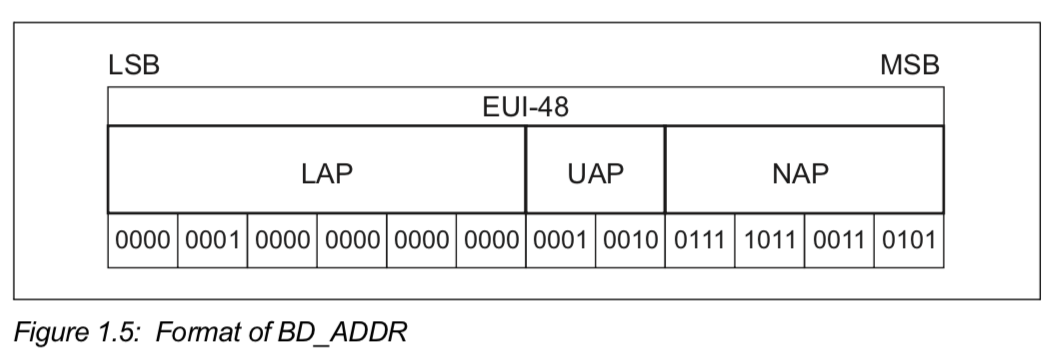
LAP中有64个:0x9E8B00-0x9E8B3F是用来做inquiry的。0x9E8B000 是用来做 General inquiry,余下的63个是用来做Dedicate inquiry。当保留LAP被使用的时候,UAP会是0x00,Default Check Initialization。
所有的蓝牙数据包都以access code为开头,所有的access code是从LAP生出来的。access code是为了告诉对方,数据包来了,该做准备了,而接收方也可以根据access code来确定这包数据是不是属于自己的。
device access code (DAC)
channel access code (CAC)
Inquiry access code (IAC)IAC 又分为 GIAC 和 DIAC
蓝牙有79个信道,每个信道2M

Spec总共有定义如下5种channel
Basic piconet physical channel
Adapted piconet physical channel
Page scan physical channel
Inquiry scan physical channel
Synchronization scan physical channel
在建立连线后,Slave会以Mater的clock为准。Master和Slave以一个slot为单位进行Tx和Rx,Master在clock为偶数时发包,Slave在clock为偶数时收包,如下面的两张图。
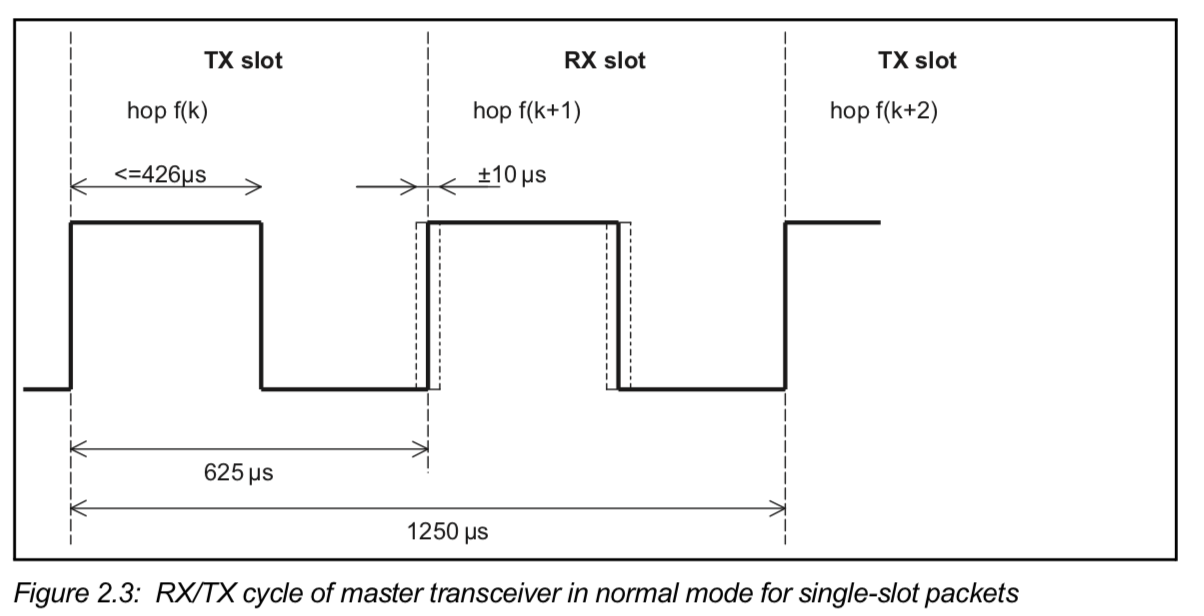
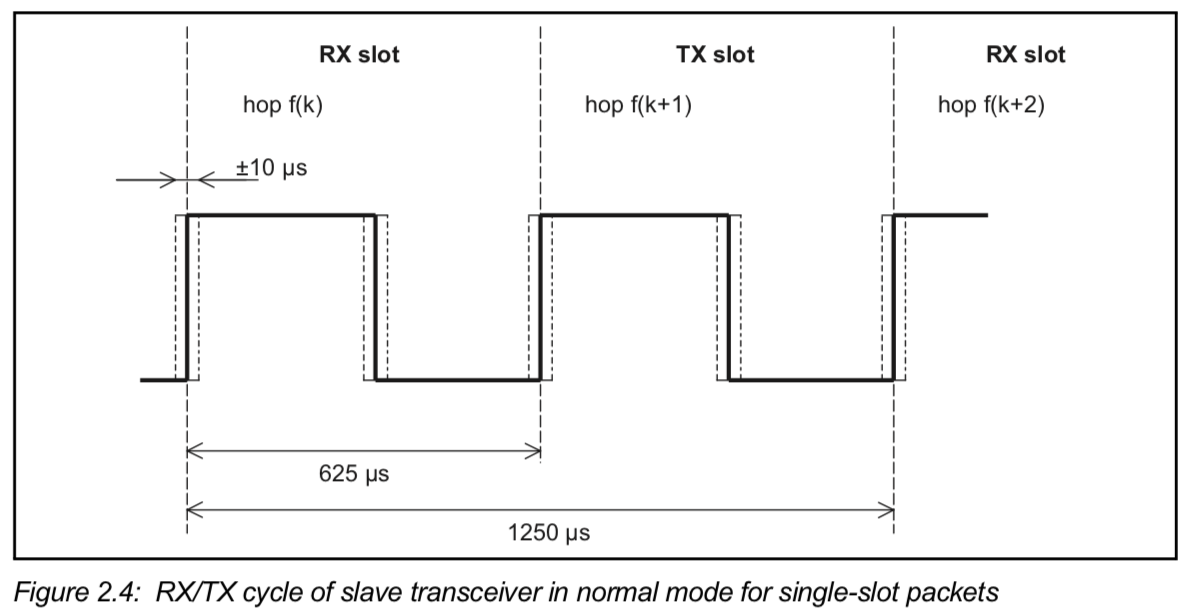
为了处理time sliping,定义uncertainty window来增加Rx的时候收到包的几率,Slave可以加大自己的Rx时间uncertainty window来提高收到包的几率。
如果在250ms内等不到Master的包,那Slave就只能认为是短线了。
用到的channel个数可能会少于79个,不过至少会是20个。
在Paging的时候,Master会发送paging message(就是ID packets),这个时候的跳频速度是 3200 hops/s,在Tx的slot内会打两次包,在Rx的Slot内也会收两次Slave的回应。
Slave在收到Master的paging messagse后的625us会回一个slave reponse packet。Master在收到这个reponse packet的后面的那个Tx slock再发一个master page reponse packet。
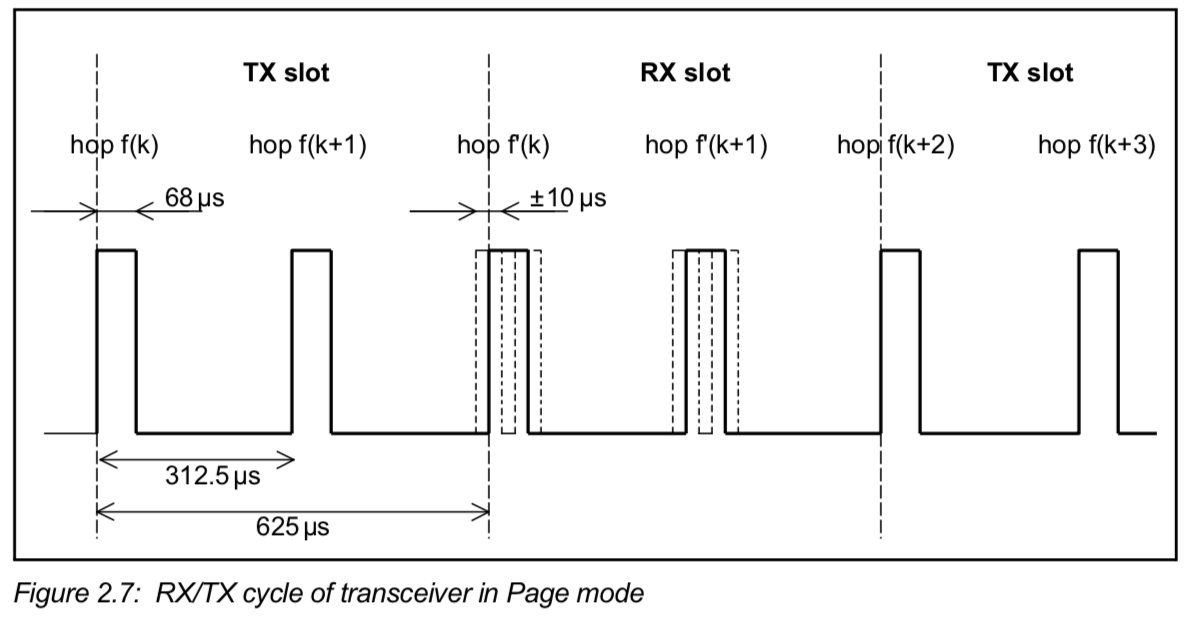

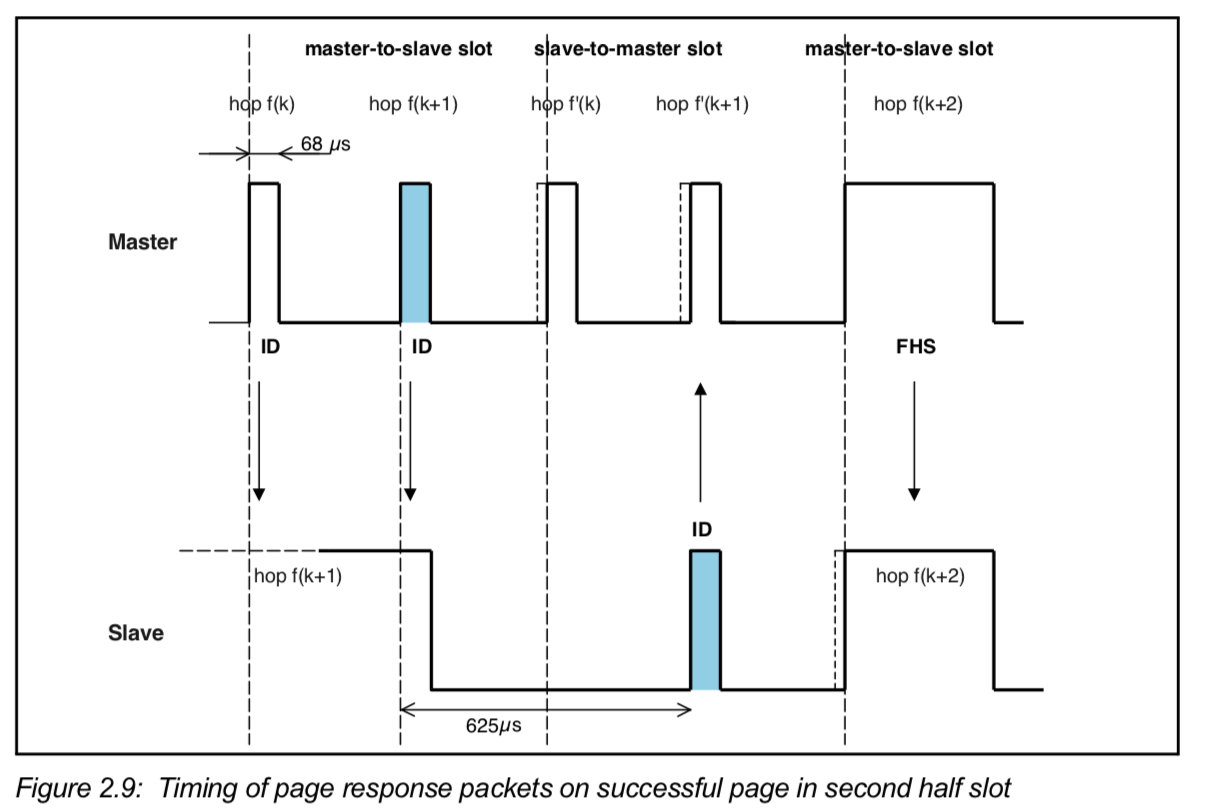
在Inquiry的时候,Master会一直发送inquiry mesasge,带上GIAC 或 DIAC。
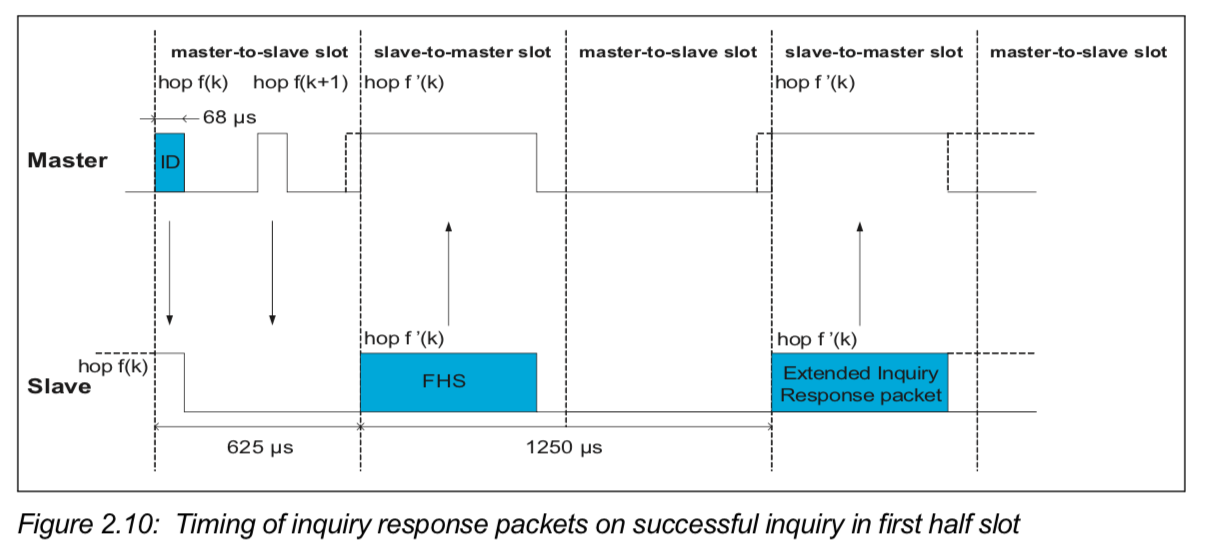
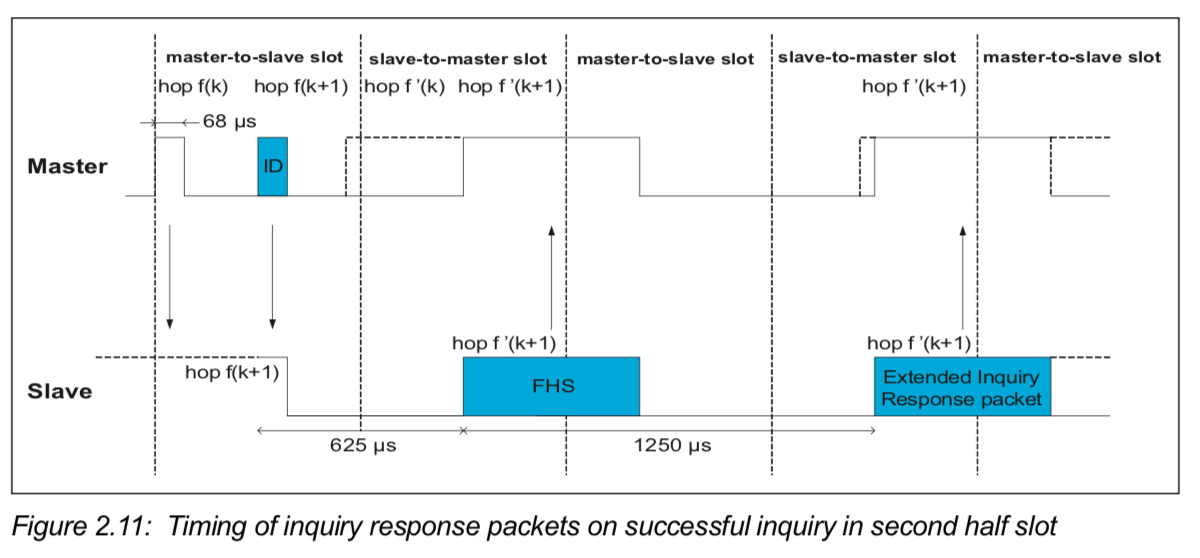
据说跳频的理论模型还是个演员发明的。
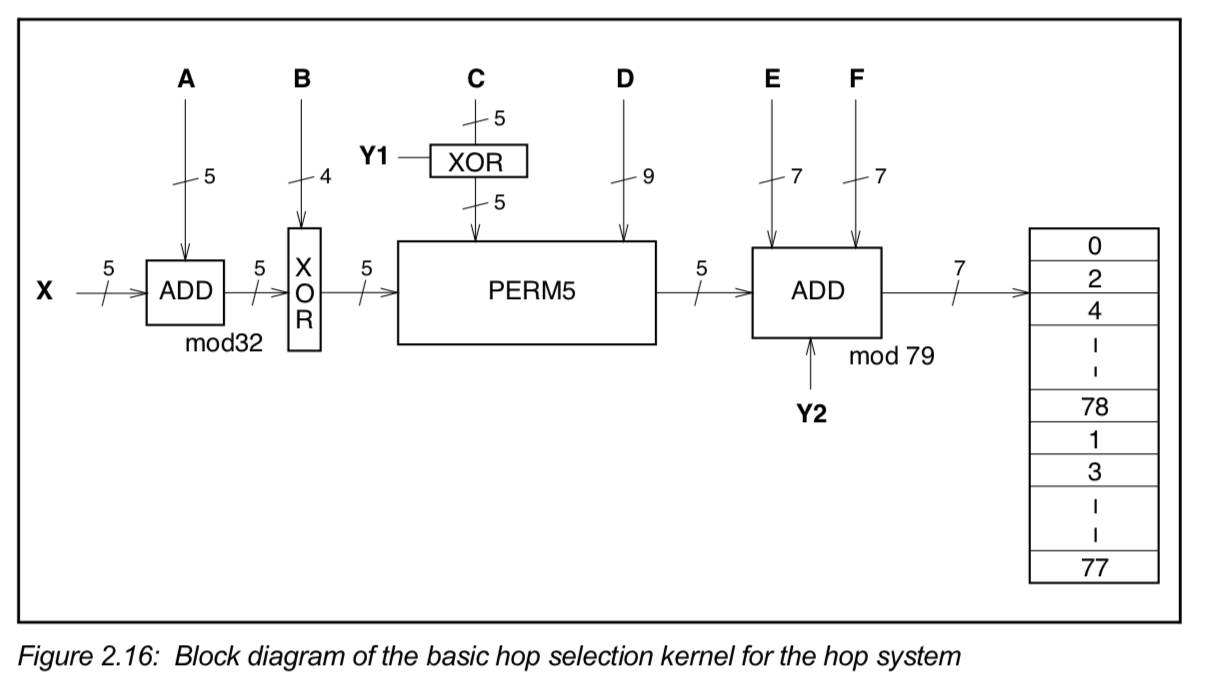
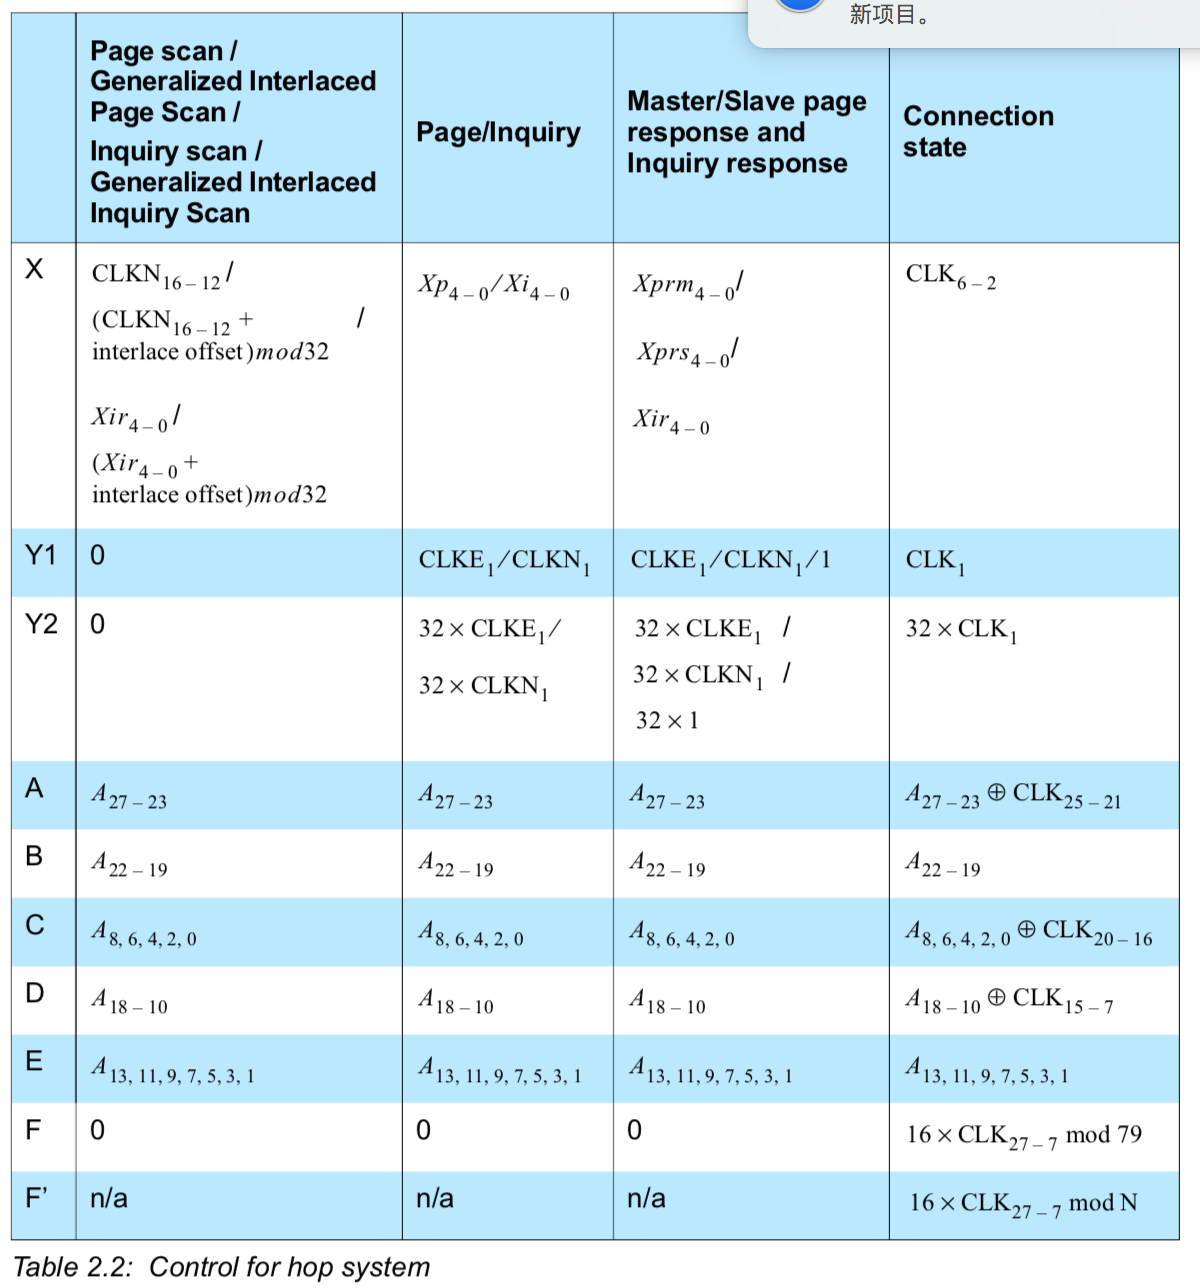
官网规范
由于蓝牙设备在使用上有配对的流程,对于没有UI的设备来说,非常的不方便或是不安全。像Apple的Airpod,只要打开盒子,Apple的手机自动就弹出画面,只要点击一下就完成配对,非常的方便。
所以Google也在Android上搞了一个类似的东西,叫做Fast Pair。目前前几名的蓝牙大佬已经支持了。
本文就介绍Google Fast Pair (GFPS) 的基本原理。
首先厂商需要到Nearby Devie注册自己的支持Google Fast Pair的设备,Nearby Device会分配Modle ID 和public key 及private key给该设备。
设备端通过BLE advertising广播自己的身份信息,当手机端发现搜索到的广播信息里表面设备支持GFPS,而且能认出该设备广播的modle ID的时候,就发起BLE连线到该设备,设备端发送其BR/EDR地址给手机,发送的数据是加密过的,手机拿到地址后发起BR/EDR连线,触发配对等流程,等BR/EDR连线都完成后,BLE连线就断开,整个Fast pair流程就结束。
整个过程,只有手机在发现支持GFPS的设备的时候,询问用户是否要连线,用户只要点击一下就行。
设备的TX power设定有讲究
The best way to determine the value is to measure the actual output of the device using an Android phone at 1 meter away, and then add 41 dBm to that. 41 dBm is the average signal strength loss that occurs over 1 meter.
Tx power 可以设定在广播包内,也可以设定在设备注册阶段就添上。
如果是在设备注册时就添上了Tx power的话,那所有的广播包都应该用这个Tx Power3. 关于Key
- 反偷听的Public key 和private key(Anti-Spoofing Public/Private Key Pair)
Private Key是 256bits,建议保存在安全区域,避免泄露出去
Public Key在Seeker端才用得到- Account Key list
Account key是为了让Seeker能识别出来这个key是属于某个google账号的。
| Service | UIID |
|---|---|
| Fast Pair Service | 0xFE2C |
| 单元格 | 单元格 |
该Serviceyou如下的Charicterristic
| Fast Pair Service characteristic | Encrypted | Permissions | UUID |
|---|---|---|---|
| Key-based Pairing | No | Write and notify | 0x1234 |
| Passkey | No | Write and notify | 0x1235 |
| Account Key | No | Write | 0x1236 |
MTU 的size 应该是83,23 也是可以的。
Provider和Seeker基于一把private key,每次出发pair,public key/private key pair都应该不一样
| Octet | Data type | Description | Value | Mandatory? |
|---|---|---|---|---|
| 0 - 1 | uint128 | Encrypted Request | varies | Mandatory |
16 - 79 |Public Key|varies|Optional|
介绍git原理的不错的文章: git from inside out
Mac01:BlueShell wnnwoo$ git reflog
894474c (HEAD -> master) HEAD@{0}: reset: moving to HEAD^
fcdea80 (origin/master) HEAD@{1}: commit: fix build error
894474c (HEAD -> master) HEAD@{2}: commit: update basic operation
94e2258 HEAD@{3}: commit: Run the scheme testing
f305bac HEAD@{4}: commit: add generics test code
4acfba7 HEAD@{5}: commit: Add error handle
control + r # search the history command
医生的职责是把铁拐修好,让病人可以去他们想去的地方。
如果是一大碗悲剧,最好一勺一勺的喂。很少有病人要求一口气吃完,大多数都需要时间去消化。
背负起别人的十字架,你总有时候会被重压压垮。
我看到自己皮囊之下瘦骨嶙峋,像行走的X光片。
展望无限广阔的未来,我看到的不是寂静无人的空荡荒原,而是更简单纯粹的东西:一页我将继续书写的白纸。
在想要设置为标题的文字前面加#来表示,一个#是一级标题,二个#是二级标题,以此类推。支持六级标题。
注:标准语法一般在#后跟个空格再写文字。
要加粗的文字左右分别用两个*号包起来
要倾斜的文字左右分别用一个*号包起来
要倾斜和加粗的文字左右分别用三个*号包起来
要加删除线的文字左右分别用两个~~号包起来
这是加粗的文字
这是倾斜的文字`
这是斜体加粗的文字这是加删除线的文字
在引用的文字前加>即可。引用也可以嵌套,如加两个>>三个>>>n个… 貌似可以一直加下去
示例:
这是引用的内容
这是引用的内容
这是引用的内容
三个或者三个以上的 - 或者 * 都可以。
示例:
语法:
!图片alt
图片alt就是显示在图片下面的文字,相当于对图片内容的解释。
图片title是图片的标题,当鼠标移到图片上时显示的内容。title可加可不加
示例: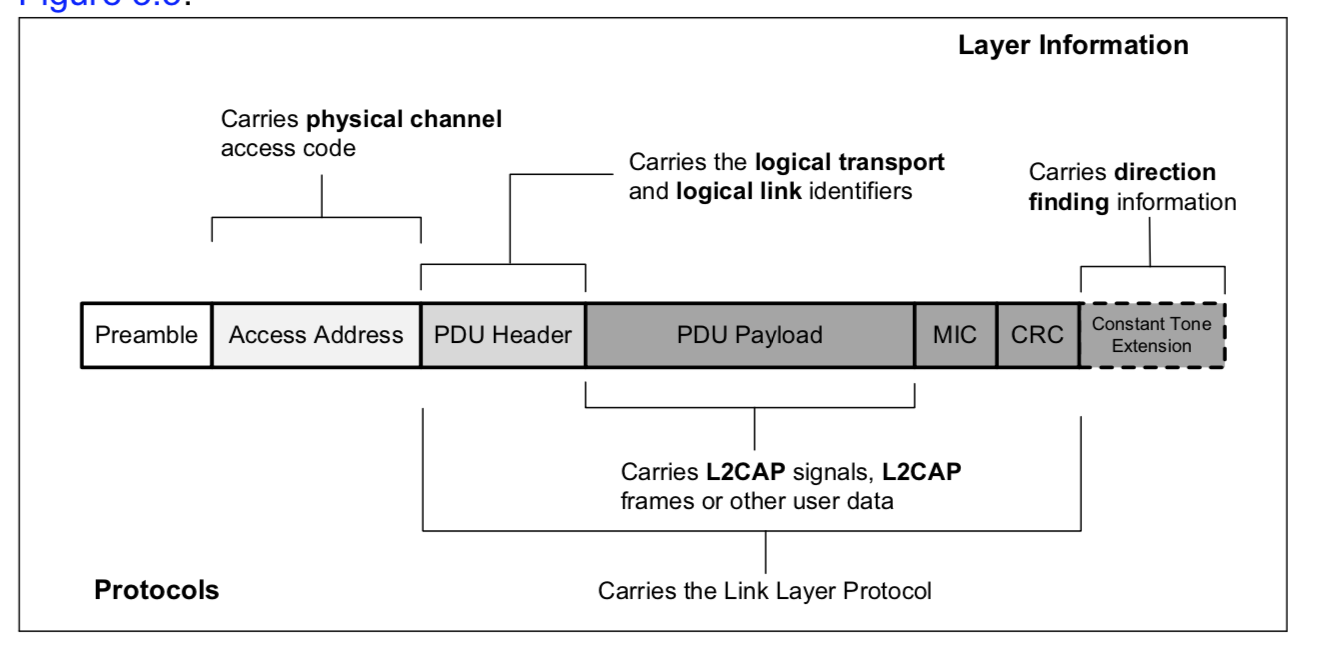
插入本地图片需要修改主题_config.yml配置文件post_asset_folder项为true,使用插件达到插入本地图片,在根目录输入如下命令安装:
$ npm install hexo-asset-image —save
new 一篇博客时/source/_posts文件夹内除了xxxx.md文件还有一个同名的文件夹,把图片放到里面即可.
最后在xxxx.md中想引入图片时,先把图片复制到xxxx这个文件夹中,然后只需要在xxxx.md中按照markdown的格式引入图片:
语法:
[超链接名](超链接地址 “超链接title”) title可加可不加
示例:
[简书](http://jianshu.com)
[百度](http://baidu.com)
如果链接的最后一个字符是右括号 ),会有转义的问题,可以参考这个link Symposium(Plato)
注:Markdown本身语法不支持链接在新页面中打开,貌似简书做了处理,是可以的。别的平台可能就不行了,如果想要在新页面中打开的话可以用html语言的a标签代替。
\超链接名\</a>
无序列表
语法:
无序列表用 - + * 任何一种都可以
注意:- + * 跟内容之间都要有一个空格
有序列表
语法:数字加点,序号与内容之间要有空格
语法:
表头|表头|表头
|—-|:—:|—-:|
内容|内容|内容
内容|内容|内容
第二行分割表头和内容。
示例:
| 姓名 | 技能 | 排行 |
|---|---|---|
| 刘备 | 哭 | 大哥 |
| 关羽 | 打 | 二哥 |
| 张飞 | 骂 | 三弟 |
语法:
单行代码:代码之间分别用一个反引号包起来
`代码内容`
代码块:代码之间分别用三个反引号包起来,且两边的反引号单独占一行
(```)
代码…
代码…
代码…
(```)
示例:
单行代码create database hero;
代码块1
2
3
4function fun(){
echo "这是一句非常牛逼的代码";
}
fun();
1 | npm install --save hexo-filter-flowchart |
语法,请参考官网
这里介绍美人鱼Mermaid的sequence chart
安装插件
1 | npm install hexo-filter-mermaid-diagrams |
配置theme下的config,将/themes/next/_config.yml内mermaid模块enable为true
1 | # Mermaid tag |
如果#2后还不起作用,那么配置博客根目录下的 _config.yml,在最后添加
1 | # mermaid chart |
编辑/themes/next/layout/_partials/footer.swig,在最后添加如下内容:
1 | {% if theme.mermaid.enable %} |
如果不奏效的话,把blog/_config.yml中的external_link设置为false和设置为true都试下.
完成前5步后,hexo g, hexo s还是不起作用,后来hexo clean之后再hexo g, hexo s,终于可以看到效果了
hexo g
hexo s
hexo d
在推送前要在 _config.xml中配置好git地址deploy:
type: git
repository: https://github.com/wnnwoo/wnnwoo.github.io.git
branch: master
_config.xml的post_asset_folder:设置为true
npm install hexo-asset-image —save
如果遇到类似下面的问题
Mac01:wnnwoo.github.io wnnwoo$ npm install hexo-asset-image —save
npm WARN babel-eslint@10.0.2 requires a peer of eslint@>= 4.12.1 but none is installed. You must install peer dependencies yourself.
- hexo-asset-image@1.0.0
updated 1 package and audited 9303 packages in 15.824s
found 4 vulnerabilities (2 low, 2 high)
runnpm audit fixto fix them, ornpm auditfor details
是因为有版本不兼容的问题,执行下面的语句就可以了。
npm install -g npm
运行hexo n “file name”来生成md博客时,会在_post目录下看到一个与博客同名的文件夹
可以用下面的几个方法来引入图片,
不过我自己试的时候,总是显示不出来图片
无奈,我用4.1 和4.2 都不行,只好购买阿里云,显示cloud上的图片是没问题的。
hexo new page categories
成功后会提示INFO Created: ~/Documents/blog/source/categories/index.md
根据上面的路径,找到index.md这个文件,打开后默认内容是这样的:
2
3
4
title: 文章分类
date: 2017-05-27 13:47:40
---
添加type: “categories”到内容中,添加后是这样的:1
2
3
4
5---
title: 文章分类
date: 2017-05-27 13:47:40
type: "categories"
---
保存并关闭文件,打开其他markdown文件,然后加入categories,之后hexo就会自动生出来categories。1
2
3
4
5
6---
title: 鱼王
date: 2017-05-26 12:12:57
categories:
- 阅读
---